Few helmets in pop culture command as much respect and awe as Boba Fett's iconic bucket. Its battle-scarred, hard-won appearance isn't just paint; it's a visual diary of countless skirmishes and close calls. Replicating that legendary look on your own Boba Fett helmet, especially the intricate painting and weathering, can feel like a daunting task. But what if you could achieve screen-accurate results without investing in expensive airbrush equipment?
This guide strips away the mystery, showing you how to master the art of painting and weathering Boba Fett helmets using nothing but readily available spray cans. We're talking professional-grade authenticity, built layer by painstaking layer, with meticulous attention to detail and a secret weapon: patience. Whether you're working with a pre-made resin cast or a freshly printed 3D helmet, prepare to transform a blank canvas into a relic of the Outer Rim.
At a Glance: Your Path to a Legendary Helmet
- Spray Cans are Your Airbrush: Achieve stunning detail and weathering without specialized airbrush equipment.
- Preparation is King: Thorough cleaning and sanding are non-negotiable for a durable finish.
- Wire Wool is Your Secret Weapon: Use grade 0000 wire wool between every paint coat for superior adhesion and smoothness.
- Maskol for Damage: Liquid latex is crucial for masking battle damage, preserving underlying layers.
- Layer, Dry, Repeat: Success lies in thin coats, ample drying time, and systematic layering.
- Reference Templates Relentlessly: Precision in color placement and damage patterns is key to authenticity.
- Safety First: Always work in a well-ventilated area with appropriate PPE.
Why Spray Cans? Unlocking Professional Results on a Budget
When picturing high-end prop painting, many immediately think of airbrushes. While they offer precise control, they also come with a significant cost and learning curve. Spray cans, or "rattle cans," on the other hand, are affordable, widely available, and surprisingly capable. With the right technique – focusing on thin, even coats and careful masking – you can replicate the nuanced color transitions and subtle weathering effects that define Boba Fett's helmet. This method democratizes prop building, making an authentic replica accessible to more enthusiasts.
Gathering Your Arsenal: Essential Tools & Materials
Before you even think about cracking open a paint can, assembling the right tools and materials is paramount. Think of this as your mission briefing: you wouldn't go bounty hunting without your gear, right?
The Foundation: Your Helmet Base
- Base Helmet: A high-quality starting point is essential. Whether you choose a pre-made resin cast or a 3D-printed one, ensure it's made from durable materials like ABS plastic or resin for optimal paint adhesion and longevity.
Precision & Application: Your Hands-On Kit
- Wire Wool (Grade 0000): This fine-grade wire wool is your absolute best friend for smoothing surfaces and enhancing paint adhesion between coats.
- Sandpaper (Various Grits):
- Smoothing: 120, 220, 400, 600 grits for initial shaping and imperfection removal.
- Fine Sanding: 800-1200 grits for delicate sanding between base coats.
- Masking Tape: Various sizes (e.g., 1/4 inch, 1/2 inch, 1 inch) for intricate masking patterns. Good quality painter's tape prevents bleed-through.
- Maskol (Liquid Latex): Essential for creating battle damage and preserving underlying paint layers. Small paint brushes are needed for its application.
- Knife/Hobby Knife: For precise cutting of masking tape and scraping off dried Maskol.
- Helmet Stand: Crucial for easy access and even drying during painting.
- Aerosol Spray Cans: Your primary painting tool. Ensure nozzles are clean and functional.
- Palette/Mixing Surface: For small touch-ups or mixing custom washes.
- Reference Templates: Printouts or digital images of accurate Boba Fett helmet paint schemes and damage patterns. These are non-negotiable for authenticity.
Safety & Workspace: Protect Yourself and Your Environment
- Gloves: Nitrile or latex gloves protect your hands from paint and chemicals.
- Respirator: A high-quality respirator with organic vapor cartridges is absolutely vital for protecting your lungs from paint fumes.
- Well-Ventilated Area: Work outdoors or in a garage with open doors and fans. Never paint in an enclosed space.
- Drop Cloths: Protect your workspace from overspray.
Cleaning Protocol: A Pristine Canvas
- Mild Detergent & Water: For initial helmet cleaning.
- Soft Brush: For scrubbing hard-to-reach areas.
- Compressed Air: To remove dust and debris from crevices.
- Tack Cloth or Lint-Free Cloth: Essential for removing fine dust particles before painting.
- Isopropyl Alcohol (IPA): For a final degreasing wipe down before primer.
Weathering & Details (Optional but Highly Recommended)
- Black/Brown Washes: Acrylic or oil-based washes for accentuating shadows, grime, and panel lines.
- Drybrushes: Various sizes for applying subtle scuffs and highlights.
- Sponge Applicators: For creating speckled, chipped paint effects.
- Decal Paper & Clear Transfer Sheet: For any specific helmet decals (e.g., kill stripes if not hand-painted, or small insignias).
The Palette of the Hunt: Recommended Spray Paints
Selecting the right colors is critical. Boba Fett's helmet is a symphony of greens, greys, and earth tones, all subtly distressed. Stick to reputable brands known for good spray patterns and durability.
- Primer: Grey automotive primer (e.g., Rustoleum). This is your canvas.
- Metallics: Metallic silver (e.g., Rustoleum). This forms your core battle damage layer.
- Base Colors:
- Matt black (e.g., Humbrol)
- Beige (e.g., Desert 4 Grey Beige Army Issue)
- White (e.g., Rustoleum Gloss White)
- Off-white (e.g., Rustoleum Heirloom White)
- Sand (Matt, e.g., Humbrol)
- Light olive (e.g., Humbrol)
- Lawn green (e.g., Wilko)
- Dark Green 30 (e.g., Humbrol): This is the key color for Boba Fett's iconic look. Do not compromise on this shade.
- Accent Colors:
- Dessert yellow (e.g., Humbrol)
- Purple (e.g., Hycote Metallic)
- Yellow (e.g., Plasti-kote)
- Red (e.g., Wine Red Plasti-kote, Lazer Red for ear detail)
- Clear Coat:
- Matt clear coat (e.g., Rustoleum Matt Clear Coat)
- Alternatively, consider high-gloss/matte clear coats like 2-part epoxy, automotive-grade acrylic varnishes, or polyurethane sprays for maximum durability.
The Journey Begins: Meticulous Preparation
No shortcut exists for preparation. This phase sets the stage for every subsequent layer, ensuring your paint adheres properly and your finished helmet looks authentic, not amateur.
- Initial Cleaning: Begin by thoroughly cleaning your helmet with mild detergent and water. Use a soft brush to get into all the nooks and crannies. Rinse completely and allow it to dry fully. Any residue will compromise paint adhesion.
- Smoothing Imperfections: Lightly sand the entire helmet with 120-600 grit sandpaper to smooth out any print lines, mold seams, or surface imperfections. This also provides "tooth" for the primer to grip.
- Final Cleanse: Once smoothed, use compressed air to blow off sanding dust, then wipe down the entire surface with a tack cloth or lint-free cloth. For a final degrease, wipe with isopropyl alcohol and let it evaporate completely.
Building the Foundation: Primer & Silver Damage Layer
This is where the magic of "without airbrush" begins to shine, establishing the deep, layered battle damage that defines Boba Fett.
Step 1: Primer Application
Primer acts as a bonding agent between the raw helmet material and your paint, creating a uniform, receptive surface.
- First Coat: Apply a thin, even coat of grey automotive primer, holding the can 6-8 inches away and using steady, sweeping motions. Avoid oversaturating any area to prevent drips.
- Light Sanding: Allow the first coat to dry for at least 30 minutes. Then, gently sand the entire helmet with grade 0000 wire wool or 800-1200 grit sandpaper. This removes any minor dust specks or orange peel texture, ensuring a buttery-smooth subsequent layer. Clean with a tack cloth.
- Second Coat: Apply a second thin, even coat of primer.
- Curing: Let the primer cure for a full 24 hours. Patience here is crucial; rushing this step can lead to peeling later.
Step 2: Metallic Silver Base – Your Battle Damage Secret
This silver layer is the "metal beneath the paint," which will be selectively exposed to simulate deep scratches and chips.
- Full Coverage: Apply metallic silver spray paint over the entire helmet. Aim for two thin, even coats, allowing adequate drying time between them.
- Battle Damage Masking (Maskol): This is where your reference templates become invaluable. Using a small brush, carefully apply Maskol (liquid latex) to small, irregular areas where you want to reveal the silver "metal" beneath the future paint layers. Think about high-impact areas, edges, and specific damage points seen on the reference. Use varied brush strokes to make the damage look organic. Let the Maskol dry completely until it's a solid rubbery texture.
- Wire Wool & Repeat: After the silver has dried (and before applying Maskol for the next layer of silver), gently wire wool the entire helmet again. Apply a second coat of silver, letting it fully harden for 24 hours.
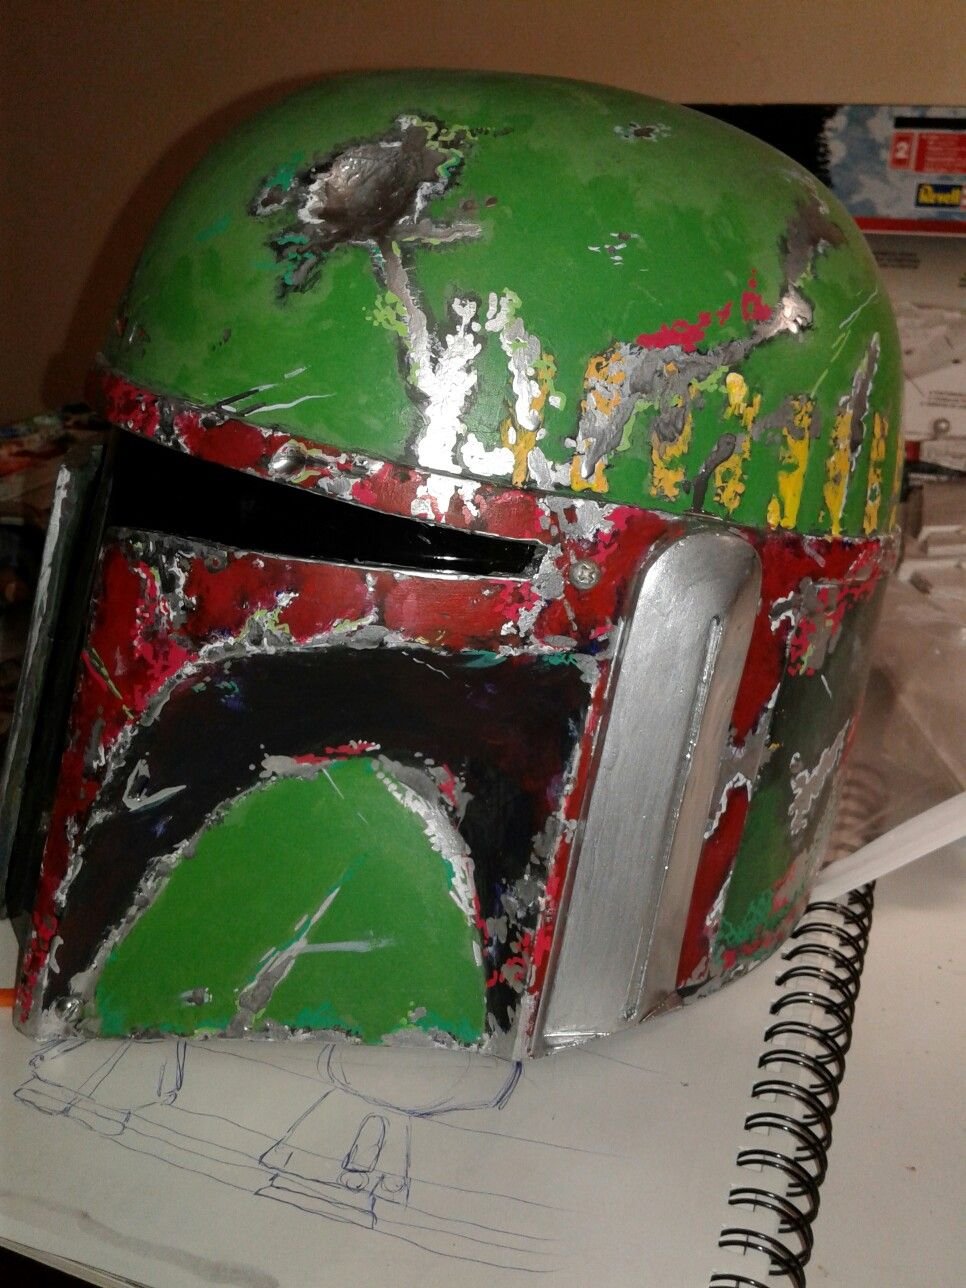
The Heart of the Helmet: Layered Painting, Section by Section
Boba Fett's helmet isn't one solid color; it's a tapestry of distinct colored panels, each with its own wear and tear. This multi-step process requires meticulous masking, layering, and patience. Always refer to your templates!
3.1. Back Panels: Building Up the Greens and Beiges
- Mask Everything Else: Carefully mask off all other areas of the helmet, leaving only the back panels exposed. Precision here saves headaches later.
- First Color (Heirloom White): Apply Maskol over any silver areas on the back panels you want exposed. Then, spray 2 thin coats of Heirloom White.
- Layering Olive Green: Wire wool the white layer, then apply Maskol to new areas you want to remain white (for smaller chips). Spray 2 coats of Light Olive Green.
- Layering Beige: Wire wool the olive green, Maskol for new damage, then spray 2 coats of Beige.
- Final Back Color (Lawn Green): Wire wool the beige, Maskol again, then spray 2 coats of Lawn Green.
- Curing: Allow ample drying time (several hours to overnight) after each color sequence before handling or re-masking.
3.2. Dome & Lower Cheeks: The Iconic Dark Green
This section covers the large, defining green areas of the helmet.
- Mask Precisely: Mask off the back panels, upper cheeks, and the visor/mandible areas, leaving only the dome and lower cheeks exposed.
- Initial Damage Maskol: Apply Maskol for the iconic "dent" on the dome and any other chips or scratches you want to preserve the underlying silver.
- Grey Base: Apply 2 thin coats of grey spray paint. Wire wool between coats.
- The Key Color (Dark Green 30): Wire wool the grey layer, apply new Maskol for grey chips if desired, then apply 2 thin, even coats of Dark Green 30 (Humbrol). This specific shade is crucial for authenticity.
- Curing: Let this section dry for a full 24 hours before moving on.
3.3. Upper Cheeks: The Dark Contrast
- Isolate: Mask off all but the upper cheeks.
- Grey Base: Apply 2 thin coats of grey. Wire wool between coats.
- Matt Black: Wire wool the grey, Maskol for new damage, then apply 2 thin coats of Matt Black.
3.4. Mandibles, Helmet Band, & Back Vent: Reds and Purples
These areas add splashes of vibrant, yet weathered, color.
- Mask Carefully: Isolate these specific areas.
- Grey Base: Apply 2 thin coats of grey.
- Purple Layer: Wire wool, Maskol, then apply 2 coats of Hycote Metallic Purple.
- Wine Red: Wire wool, Maskol, then apply 2 coats of Wine Red (Plasti-kote).
3.5. Right "Ear" (Acoustic Sensor Housing)
This small component has distinct layering.
- Prime: Ensure the ear parts are individually primed.
- Heirloom White: Apply 2 coats of Heirloom White.
- Lazer Red: Carefully mask and apply a tiny spot of Lazer Red where indicated by references.
- Humbrol Olive Green: Wire wool, Maskol for damage, then apply 2 coats of Humbrol Olive Green.
3.6. Left "Ear" (Rangefinder Holder)
This part also features distinct color blocking.
- Prime: Prime the individual parts of the left ear.
- Top Part (Range Finder Holder): Apply Humbrol Sand.
- Bottom Part: Apply Metallic Silver.
- Middle Section: Mask off the top and bottom. Apply Humbrol Sand, adding tiny Maskol dots for scratches.
Bringing It to Life: Details & Weathering
Once all the primary colors are down, it's time to peel back the layers and add the nuanced signs of a life well-fought.
Peeling Back the Maskol
Gently peel off all the dried Maskol. Use a hobby knife to carefully lift edges if needed. This will reveal the silver (and other underlying colors) that simulate chipped and scratched paint. You'll instantly see your battle damage come to life!
4.1. Kill Stripes
Boba's helmet features distinctive kill stripes on the rear.
- Initial Outline: Hand-draw 14 stripes on the rear of the helmet, approximately 1 inch high by 1/4 inch wide, referencing your templates.
- Mask Basic Shapes: Use thin masking tape to outline the basic rectangular shape of each stripe.
- Detail Maskol: Apply Maskol within these masked rectangles to create individual stripe damage and wear.
- Yellow Paint: Apply 2 thin coats of Plasti-kote Yellow. Let dry, then carefully remove all masking and Maskol.
4.2. Ear Details
- Right Ear: Use thin masking tape to create a white curved line (using Heirloom White) on the right ear. Apply 2 coats.
- Left Ear: Create a black curved line with a smaller white line inside it, using careful masking and 2 coats for each color.
4.3. General Weathering & Dry Brushing
This step adds depth and realism to the existing damage.
- Scratches & Scuffs: Using silver, grey, and black paints applied with a fine brush via dry brushing, gently highlight edges, corners, and areas around the visor. The goal is to simulate subtle metallic scuffs and grime, building up thin layers for a worn look.
- Visor Wear: Apply metallic paint (dry-brushed) to the edges of the visor to simulate worn metal. Follow with a light black wash to give it a grimy, tinted appearance.
4.4. Washes for Grime and Shadow
Use thin black or brown washes to accent panel lines, recessed details, and areas where grime would naturally accumulate. Apply sparingly and wipe away excess for a subtle, aged effect.
Sealing the Deal: The Clear Coat
The clear coat is your final protective layer, locking in all your hard work and providing a uniform finish.
- Final Polish & Clean: Gently wire wool the entire helmet one last time to remove any minor imperfections or dust from weathering. Then, clean thoroughly with a dry rag or tack cloth. Ensure it's immaculate before clear coating.
- Apply Clear Coat: Apply 2-5 thin, even coats of a matt clear coat. Hold the can 8-12 inches away, using sweeping motions. For larger areas or more durability, consider a high-quality automotive-grade clear.
- Light Sanding (Optional): If you notice any dust specks or orange peel between coats, you can very lightly sand with 800-1200 grit sandpaper, but proceed with extreme caution as you can easily sand through your paint layers at this stage. Clean thoroughly after.
- Curing: Allow the clear coat to fully cure for 24-48 hours. This is vital for durability and hardness. Do not touch or handle the helmet excessively during this period.
The Final Assembly & Inspection
You’re almost there! This is where your creation truly comes to life.
- Attach the Rangefinder: Securely attach the rangefinder, ensuring it is straight and level. If working with cast rangefinders, you might need to reinforce them with wire and Bondo for stability before painting. For a complete guide to all things Fett, including building your own Boba Fett helmet from scratch, check out our comprehensive guide.
- Inspect and Touch Up: Carefully inspect the helmet for any small paint imperfections, chips, or scratches that occurred during handling. Use a fine brush and appropriate paint to touch these up.
- Attach Accessories: Secure any smaller accessories such as the keyslot, microphone, and side antennas.
- Evaluate: Step back and evaluate the helmet's overall symmetry, weathering balance, and adherence to your reference templates.
- Final Clean: Give it a gentle wipe-down with a soft, lint-free cloth. If it's a wearable helmet, test the fit and comfort.
Beyond the Paint: Essential Tips for a Flawless Finish
Achieving a professional-looking Boba Fett helmet isn't just about following steps; it's about adopting a craftsman's mindset.
- Patience, Always Patience: This is perhaps the most critical insight. The detailed masking, layering, and drying times are not negotiable. Rushing leads to mistakes, smudges, and a less durable finish.
- Wire Wool is Your Unsung Hero: Seriously, using grade 0000 wire wool between every single paint coat (primer, silver, and color layers) is paramount. It ensures optimal adhesion, a super smooth finish, and prevents paint from peeling.
- Reference Templates are Your Bible: Do not eyeball details. Print out high-resolution reference images and detailed templates. Accuracy in color placement, battle damage, and stripe patterns is what separates a good replica from a great one.
- Thin Coats, Always: Whether it's primer, color, or clear coat, apply paint in multiple thin, even layers. Thick coats lead to drips, uneven textures, and significantly longer drying times.
- Adequate Drying & Curing: Respect the drying times. 24 hours for major paint steps and 24-48 hours for the clear coat's full cure will prevent smudging, ensure durability, and allow the paint to harden properly.
- Dark Green 30: Your Signature Color: This specific Humbrol shade is widely recognized as the most accurate for Boba Fett's helmet. Don't substitute it with just "dark green."
- Safety First, Always: Work in a well-ventilated area to disperse fumes, and always wear a respirator and gloves. Your health is more important than any prop.
- Maintain Your Masterpiece: Once complete, treat your helmet with care. Avoid extreme temperatures, direct sunlight (which can fade paint), and excessive moisture. Store it in a protective case, and if it sees heavy use, consider reapplying a clear coat every few years.
Frequently Asked Questions
How long does the entire painting process take?
Realistically, expect the process to take 1-2 weeks due to the extensive drying and curing times required between layers. While you might work on it for only a few hours a day, the waiting periods are crucial.
Can I use different paint brands than those recommended?
Yes, you can substitute brands, but ensure they are compatible (e.g., all acrylics or all enamels) and test them on a scrap piece first. Always prioritize paints known for good adhesion and fine spray patterns. Humbrol's Dark Green 30 is highly recommended for its specific hue, however.
What if I make a mistake or get a drip?
For small mistakes, immediately wipe with a cotton swab dampened with paint thinner (compatible with your paint type) or isopropyl alcohol. For drips, let them dry completely, then carefully sand them down with fine-grit sandpaper (e.g., 800-1200) and re-apply a thin layer of paint. Patience is key to correction.
Your Journey to the Ultimate Fett Helmet
Crafting a Boba Fett helmet is more than just a painting project; it's an homage to a beloved character and a demonstration of skill and dedication. By embracing the power of spray cans, the discipline of layering, and an unwavering commitment to detail, you've not only saved money but also gained a deeper understanding of the meticulous process behind screen-accurate prop reproduction.
Now, with your battle-hardened helmet complete, step back and admire your handiwork. You've brought a piece of cinematic history to life, ready for display, cosplay, or simply to inspire awe. This isn't just a prop; it's a testament to your passion, forged with your own two hands, ready to embark on its next adventure.